
In case you missed it, last week’s post was all about why you might want to give gouache a try, and which paint to purchase in order to get started (including how to “soft start” with just a tube of white!) This week we’ll go over some gouache tips and tutorials that will be especially helpful if you’re already painting with watercolors.
*Throughout this article we’ll be talking about traditional and acrylic gouache. Check out my previous post to learn more about the difference between the two and pros and cons of each.
Keep It Wet
The biggest difference between gouache and watercolor is that gouache dries really quickly, and once it’s dry, it doesn’t re-wet as readily as watercolor (or at all, in the case of acrylic gouache). Although traditional gouache can be re-wet on your palette, the texture will be different. It’s hard to get opaque coverage with the re-wet paint. Pouring pans of gouache is not advisable – the paint will probably crumble and crack when it dries. It’s much better to keep it wet while you work. Here are some tips to keep it wet:
- Store your paint in a plastic box with a silicone seal like this. The bigger paint piles will stay wet while you work and moist for months in the sealed box.
- Mist your palette and paint box with water frequently while you work.
- Use a Sta-Wet Palette or the DIY version described in my previous post.
- Don’t paint in the sun. Use an easel umbrella for plein air painting.
- Acrylic drying retarder can be added to acrylic gouache to slow the drying time (mix it into the paint on your palette or in your paint box). If you add enough, the gouache will dry more like an oil paint.
- Keep dirty brushes in your water jar when you’re not using them (I know! So terrible for the brushes! This is one reason why you should use cheap synthetic brushes for gouache).
- Mix a little water with your paint as soon as you put it on your palette. Many brands state that their paint is designed to be used at a 1 part water/ 2 parts paint or 1 part water / 3 parts paint ratio.
Work Order
Of course, the big difference between gouache and watercolor is that you can paint light over dark OR dark over light. This means you’ll want to shake up your work order.
- The most important rule with gouache is to paint “fat over lean” or “thick over thin.” This will be familiar if you’ve worked with oils. Gouache can be diluted so much that it looks and behaves like watercolor, so you can lay down transparent washes OR thick, dimensional, strokes. The important thing is to put the thick dimensional strokes only ON TOP of the washes. If you use paint that is thinned with lots of water on top of dried layers of paint, it will re-activate the dried layer below and make mud (if you’re using traditional gouache) or bead up or crack (if you’re using acrylic gouache). With acrylic gouache, you can mix paint with a medium instead of with water in order to create a transparent top layer. Otherwise, keep those washes touching the paper – as a first layer only.
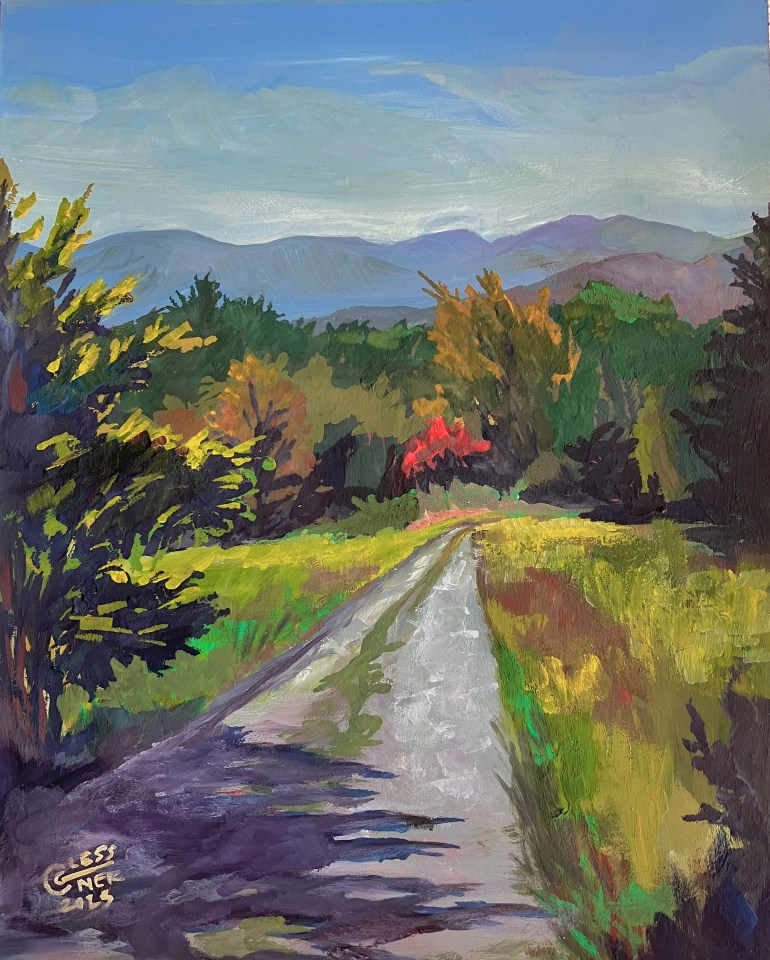
- A common work order is to use a single color of thin paint to make a grisille, or underpainting, where you can plan your values and composition. Future layers will completely or mostly cover the grisille. Many people use a warm color like yellow ochre or burnt sienna for the grisille, which will make little “sparkles” where bits show through future layers and will help you keep your colors warmer, like you’d want for a landscape on a sunny day.
- Another method is to paint thin washes as a sky or background, and then paint over this with the rest of your landscape (including clouds) or central motif. This is a nice “best of both watercolor and oils” use of gouache that creates glowing, transparent skies with lots of depth.
Blending and Mixing
Because the paint dries so quickly, blending colors on the paper feels difficult compared to watercolors. Using a moist brush to smooth edges or paint a unifying wash, as you would in a watercolor, will create a muddy mess.
- One solution is to paint with a graphic, almost “paint by number” technique, using small spots of color that blend optically instead of physically. You’ll need to do lots more mixing on your palette instead of on your paper. This can also be a bit of a challenge as the paint will dry on your palette. You’ll need to mix smaller quantities as you go, rather than making big piles to return to later.
- One way to save time is to pre-mix a grey in your paint box using the same colors you’re using for the rest of the painting. Then you can dip into it to neutralize your colors as you go.
- Colors in adjacent areas can also be blended by smearing them with your finger.
White not Water
- In order to have a full range of values, almost every mixture will probably start with adding some white. In fact, you’ll use so much white you may want to buy an extra tube or two when you purchase your paint.
- Unlike diluting with water, adding white will decrease the chroma, or vibrancy of the color. To get the sparkle of a watercolor, you’ll need to lean into careful placement of complimentary colors and colors of contrasting value – a skill you can hone and bring back to your watercolors!
The Value of Mud
- While you work, you’ll need to be careful not to accidentally scrape up bits of dried paint from your palette and incorporate it into your mixtures – especially if you’re using acrylic gouache.
- There’s much less need to clean your brush between colors with gouache – often the greater challenge is blending and cohesion, so a little “palette mud” or streakyness from a dirty brush can make your painting look better. Instead of washing your brush out with water between colors, try just wiping it on a paper towel, or not doing anything!
- Use your spray bottle to add water to your paint mixtures if you don’t want them to get muddy.
- Your wash water will get dirty quickly, but you’re using it mostly to prevent paint from drying in your brush rather than as a medium to mix with your paint, so it doesn’t need to stay clean.
Clean Up
- Be sure to wash out your brushes as soon as you’re finished. A little soap may be necessary – especially if you’re using acrylic gouache. Regular dish soap or ivory soap will be fine for synthetic brushes – there’s no need for an expensive brush soap, as these are designed to condition natural bristle brushes. In fact, the oily soap might even cause streaking issues with water based media if you don’t get it all washed out.
- Your palette will clean easily with hot soapy water.
- If you’re using acrylic gouache, consider removing as much paint as possible with a paper towel, then washing with a minimal amount of water in a bucket. Let the water evaporate from the bucket and then wipe it out with a paper towel as well, and send all those paper towels to the landfill. Acrylic is made out of plastic, so wash water is chock full of microplastics. Not something we want to pour into a home septic system that’s putting water back into the environment.
Framing Your Work
If you painted with traditional gouache on paper, you might want to start by gluing the paper to a board (like gator board, hardboard, or illustration board) so it’s held flat, making the paint less likely to crack due to temperature and humidity variations in the future. This is especially true if there are thick layers of paint. Acrylic gloss medium is a good glue for this application. Paint it liberally on the board, then lay the painting on top. Place a clean sheet of paper on top of that, then use a rubber brayer to evenly squish the painting onto the glue. Turn the panel art-side down and place a heavy book or other weight on top while it dries.
Gouache can be matted and framed under glass, or varnished and displayed without glass, like an oil painting. Personally, I love the look of a float frame or plein air frame and no glass!
- For traditional gouache, you’ll need to use a mineral spirit-based spray varnish to avoid reactivating and smearing the paint. I like Krylon UV Archival Varnish, but the Golden version is good as well. Make sure it includes UV inhibitors so it doesn’t yellow with age.
- You’ll need two or three coats of clear varnish and a coat of matte varnish for traditional gouache, or just one or two coats of matte varnish for acrylic gouache (since it’s almost waterproof already).
- For acrylic gouache or second and third coats on traditional gouache you can use a brush-on mineral spirits varnish instead.
- The varnish will darken and warm the colors of the painting slightly, and also make them more vibrant. Usually that’s a good thing, but you probably shouldn’t start with varnishing your favorite work, just in case you don’t like the look.
Demos and Tutorials:
Personally, I love the look of gouache paintings with a graphic or impressionistic style. If you want to paint landscapes like this, two artists to check out are Judd Mercer and Mike Hernandez (who’s social media handle is “Squatch Gouache.”) Both have several great full-length demos available to watch online for free (you’ll need to search – they’re on multiple sites) and offer live online classes several times per year. James Gurney, author of the essential book Color and Light as well as the Dinotopia fantasy series, is another great artist to follow with an engaging blog and a big YouTube presence. Emily Hughes is a gouache portrait artist with a busy YouTube channel, and Sarah Burns has a blog and website “The Fearless Brush,” with tons of revues and supply info and pre-recorded classes to buy, as well as a YouTube channel with free demos and classes. Search any of these artists and “art school live” for free demos on YouTube moderated by Eric Rhodes.
Do you paint with gouache? What are your favorite tips? Share below – and don’t forget to subscribe to this blog so you never miss a post!